Thinking about a basement renovation in Burlington can feel overwhelming, but you can turn that unused space into a practical, comfortable extension of your home. A well-planned renovation increases living space, improves home value, and solves common issues like dampness or poor layout—often without breaking your budget.
You’ll learn what basement renovations Burlington involve, how contractors handle permits, waterproofing, and finishing, and which upgrades deliver the most value for your goals. Use this guide to decide whether to finish a simple family room, build a livable basement apartment, or create a tailored entertainment or workspace that fits your lifestyle.
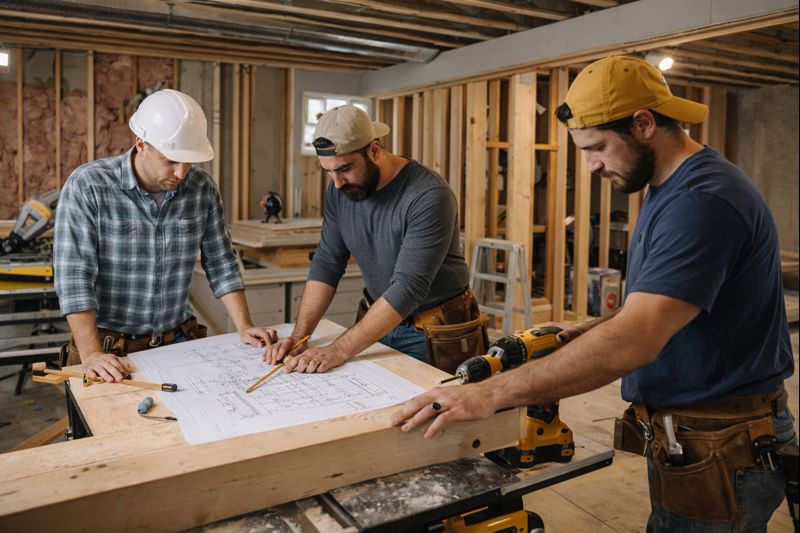
Comprehensive Basement Renovations in Burlington
You can expect detailed design, code-compliant permitting, reliable waterproofing, and targeted insulation strategies that improve comfort and reduce energy bills. Each element affects safety, resale value, and long-term maintenance.
Design Planning and Consultation
Begin by defining how you’ll use the space: a legal rental suite, family room, home office, or combined layout. List must-haves (bedroom egress, full bathroom, separate entrance) and nice-to-haves (wet bar, built-in storage, soundproofing) before the first meeting with a designer or contractor.
Hire professionals who provide measured drawings, electrical and HVAC plans, and 3D renderings. Expect site visits, condition reports, and a phased schedule that separates structural work, MEP (mechanical/electrical/plumbing), and finishes. Ask for a fixed-price estimate and a detailed scope to avoid change-order surprises.
Confirm material selections early—flooring, ceiling systems, lighting fixtures, and stair upgrades—so procurement aligns with the build schedule. Request references and past Burlington projects to verify experience with local soil, frost lines, and common foundation types.
Permits and Local Regulations
You must obtain building permits for new bedrooms, bathrooms, structural changes, and legal rental units in Burlington. The city enforces Ontario Building Code requirements for ceiling height, egress windows, fire separations, and ventilation.
Work with a contractor who prepares permit-ready drawings and coordinates municipal inspections. Expect requirements for engineered drawings if you alter footings, remove support walls, or deepen the foundation for higher ceilings. Plan lead times of two to six weeks for permit approval, depending on complexity.
Recordkeeping matters: keep copies of permits, inspection reports, and as-built drawings. These documents support resale disclosures and protect you if questions arise about code compliance or future renovations.
Waterproofing and Moisture Control
Assess existing moisture sources: perimeter drainage, sump pump condition, interior condensation, and past flood history. A thorough solution combines exterior and interior measures tailored to the foundation condition.
Exterior work may include repairing footing drains, installing or renewing waterproof membranes, and regrading soil away from the foundation. Interior fixes include installing a sump pump with battery backup, a perimeter interior drainage channel, and a sealed vapor barrier on walls and floors.
Choose materials resistant to damp conditions—cementitious backer board, closed-cell spray foam in rim joists, and water-resistant flooring such as vinyl plank or engineered tile. Schedule moisture mitigation before insulating or finishing to prevent mold and costly rework.
Energy Efficiency and Insulation
Insulate to control heat loss through foundation walls, floors, and rim joists while managing vapor flow to prevent moisture issues. Use a combination of rigid foam on foundation walls and spray foam at rim joists for continuous thermal protection.
Target R-values that meet or exceed provincial guidelines for below-grade spaces. Combine insulated subfloor systems or thermal break mats to reduce cold floors. Install energy-efficient HVAC solutions like a heat-recovery ventilator (HRV) or a ductless mini-split to condition the space without overworking your main system.
Seal air gaps at penetrations, install LED lighting, and choose ENERGY STAR appliances for ancillary spaces. These measures lower operating costs and maintain consistent temperatures, improving comfort for year-round use.
Enhancing Your Basement Space
You can turn a dark, unused basement into a functional, comfortable area by choosing the right materials, finishes, and storage systems. Focus on flooring and lighting that resist moisture, wall and ceiling treatments that conceal services and boost insulation, and storage that maximizes usable floor space.
Custom Flooring and Lighting Options
Choose flooring that handles moisture and temperature changes: luxury vinyl plank (LVP), porcelain tile, and engineered hardwood with a proper subfloor are proven choices. LVP combines water resistance with realistic wood looks; porcelain tile works well for high-traffic or wet areas; engineered hardwood adds warmth where humidity is controlled.
Plan layered lighting to avoid a cave-like feel. Combine recessed LED cans with wall sconces and an adjustable-track or pendant over seating and task areas. Use dimmers and tunable white LEDs to shift from bright work light to warm ambient evening light. Position fixtures to highlight focal points like a media wall, bar, or staircase.
Include under-cabinet or toe-kick lighting in wet bars and cabinetry for safety and ambiance. Install GFCI-protected circuits and consider low-voltage accent lighting for easier maintenance and lower heat output.
Finishing and Wall Treatments
Select wall systems that improve insulation and conceal utilities. Metal or treated wood studs with closed-cell spray foam or rigid foam board provide a dry, insulated cavity and raise ceiling height slightly. Use moisture-resistant drywall (greenboard) or cement board in high-humidity zones.
For visible finishes, go with washable paint in satin or eggshell for durability. Consider durable wall coverings—vinyl plank wall panels, engineered wood, or waterproof wall panels—where impact resistance matters, like play areas or home gyms. Add a media accent wall with acoustic panels or fabric-wrapped boards to control sound without heavy construction.
Ceilings matter: a drywall ceiling creates a polished look, while an access-friendly drop ceiling keeps mechanicals reachable. If you retain exposed joists, paint them a dark matte color to conceal ductwork and preserve headroom.
Smart Storage Solutions
Use built-ins to convert awkward nooks into functional storage. Floor-to-ceiling cabinets along one wall free up central floor space and can hide laundry, HVAC, or entertainment components behind cabinet doors. Base cabinets with pull-out drawers work better than shelves for heavy items.
Incorporate multifunctional furniture: ottomans with storage, bench seating with cubbies, and murphy desks for home offices. Use overhead shelving above the washer/dryer and clear, labeled bins for seasonal storage to keep items visible and protected from moisture.
For rental or suite conversions, create lockable storage closets for tenants and run shelving on the perimeter to maintain clear egress paths. Add adjustable shelving tracks and heavy-duty hooks in utility areas to handle tools and sports equipment without cluttering living spaces.


Leave a Reply